Art Concrete How-to
3: Working with Mesh
THIS PAGE is one of several explaining techniques about how to use concrete in small-scale art projects. Also see the step by step page for more details on this technique.
| Book: Concrete Handbook for Artists: Technical Notes for Small-scale Objects. More information? |
It's important to note that you can use a variety of mixes for different purposes. I often use a cement-sand mix (1:1 or 1:2) for applying the first couple of layers, then switch to a cement mix with no aggregate or a very fine admixture (such as stone dust or kaolin) for the final layers. See the mixes page for updated mixes.
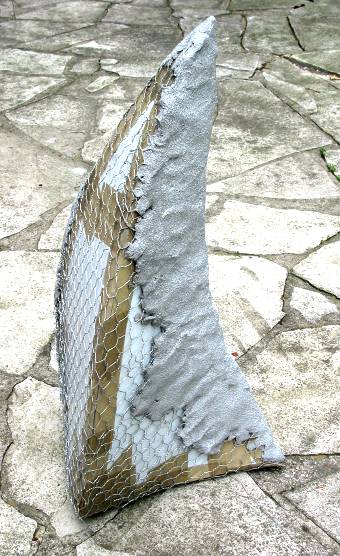
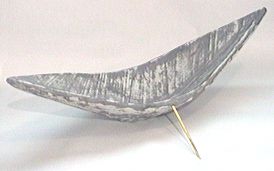 This leaf-shaped bowl was made using two mixtures applied by hand (using rubber gloves) to a galvanized steel mesh form, sometimes called hardware cloth. It is 22" or 55 cm long. Expanded metal mesh can also be used. The metal is first cut with snips (use leather gloves -- the cut edges are very sharp), formed by hand and wired at strategic places with iron wire. The metal acts as support during curing and also increases the tensile strength.
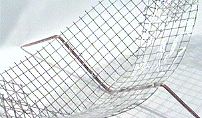 In this bowl form the basic structure was made using wire mesh to produce a three-dimensional form. The mesh is heavy enough to support itself. A heavy copper wire was wired to it to make the two legs. The inside was temporarily covered with plastic tape to prevent the mix from being pushed through.
[See the mixes page for recent improvements to these mixes.]
Mix #1
---500 ml white portland cement
---500 ml white sand
---about 40 ml polypropylene fibres (loose)
Mix this dry then add:
---about 200 ml latex solution (3 parts water: 1 part latex)
Alternate Mix #1
---500 ml portland cement
---1 L sharp sand (mortar or brick sand)
---about 20 ml fibres
Mix this dry then add:
---small amount of water with 7 drops MicroAir (air entrainer), half tsp (.25ml) Pozzolith (plasticizer)
---more water to make the right consistency
[See the mixes page for recent improvements to these mixes.]
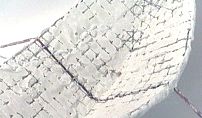 After mixing for several minutes it was applied to the outside of the steel mesh form, about 5 mm thick, and the work covered in plastic. After it set (but could still be scratched easily, about 24 hours), the form was turned over, the temporary tape was removed and the inside covered with another layer of mix to bury all the steel, pushing it well into all the spaces. A texture was then scratched or trowelled into the surface and let set for a day
Mix #2
---100 ml gray portland cement
---about 50 ml latex solution (3 water : 1 latex)
This mix was applied to the dampened bowl form and rubbed into the texture. After it set, excess was scraped off to expose the white underneath. A day of so later the whole form was wet sanded to smooth the surface. The piece was kept damp and covered for a week. Gold leaf was applied to the copper legs..
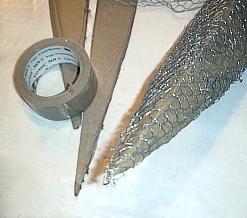 This method of using mesh is a fast way of developing a hollow form. (See image on right.) Cardboard is cut out or folded, then taped together using a waterproof tape like a packing tape shown here. The tape-wrapped cardboard is the basic shape. Make sure all the cardboard is covered by plastic tape. It is then wrapped in several layers of chicken wire, burying all the loose ends, twisting the edges together and lifting the lower layers off the cardboard. A cement-sand mix is packed into the mesh. After a day the cement covered form can be refined by filing or using a very coarse sandpaper (24 grit). The cardboard can then be removed (unless the form is a closed one). Thanks to Nicholas Rees for this method. Another method uses plastic board - see image on left - (aka 'Coroplast', the white plastic that looks like cardboard, used for election signs, backing prints, etc). I have a STEP BY STEP explanation on another page.
A variation on this method is to carve blocks of styrofoam (also called beadboard, rigid foam insulation) into the basic shape, then wrap that form in chicken wire or galvanized mesh.
| Home | HOW-TO | Materials | Small Scale | Mesh | Casting | Colour | Hazards | Books | Sources | Shapecrete |
CONTACT + LEGAL
Last update: 2016.